Thursday, March 5, 2015

Connection error to github.com

If you are getting following error:

screenshot

The error is due to the firewall. The above error can be solved using

git clone http://github.com/

Replace git: with http:, which will pass through firewall.

Monday, February 16, 2015

Run 32 bit compiler on 64 bit Ubuntu Server 14.04

Firstly, install 32 environmrnt;

         sudo apt - get install libc6 : i386

Before installing ia32-libs with the source:

sudo - i
cd / etc / apt / sources . List . d
echo "deb http://archive.ubuntu.com/ubuntu/ main restricted universe multiverse raring"  > ia32 - libs - raring . List
apt - get Update
apt - get install ia32 - libs
rm ia32 - libs - raring . List
apt - get Update
exit


When installing gcc to compile some libraries need:

sudo apt - get install gcc - multilib

Friday, February 13, 2015

Problem in installing Regression Suite

Error:

E: Package 'ia32-libs' has no installation candidate
Error running apt-get at regress/scripts/install_deps.pl line 165.

Solution:

sudo apt-get install libc6:i386
sudo -i
cd /etc/apt/sources.list.d
echo "deb http://old-releases.ubuntu.com/ubuntu/ raring main restricted universe multiverse" >ia32-libs-raring.list
apt-get update
apt-get install ia32-libs
rm /etc/apt/sources.list.d/ia32-libs-raring.list
apt-get update
exit
sudo apt-get install gcc-multilib

Problem on Wireshark Dissector installation

After run make, the make command output is ( in 'openflow/utilities/wireshark_dissectors/openflow' directory):
  
 In file included from /usr/include/glib-2.0/glib/galloca.h:34:0,
                  from /usr/include/glib-2.0/glib.h:32,
                  from packet-openflow.c:19:
 /usr/include/glib-2.0/glib/gtypes.h:34:24: fatal error: glibconfig.h: File or directory ot found
 compilation terminated.
 make: ** [packet-openflow.o] Erro 1


Solution:

openflow at ubuntu:~$ find /usr -name glibconfig.h
/usr/lib/i386-linux-gnu/glib-2.0/include/glibconfig.h

On Ubuntu, adding `pkg-config --cflags glib-2.0` (note backquotes), 
or the output of said command, to CFLAGS, should fix it. Otherwise, just make sure you pass in the correct include directory.


i.e. 

-I/usr/include/glib-2.0
-I/usr/lib/x86_64-linux-gnu/glib-2.0/include

add above 2 lines in Makefile (openflow/utilities/wireshark_dissectors/openflow), under CFLAGS

Installing OpenFlow switch in Ubuntu 14.04 Server


Please follow the instructions given in below link:

http://archive.openflow.org/wk/index.php/Ubuntu_Install 


Thursday, February 12, 2015

Enabling ethernet port in Ubuntu Server 14.04


  • ifconfig
The above command displays the network interface.


  • lspci | grep eth
  • sudo ifconfig eth0 up
The above commands enables the Ethernet port.

Wednesday, February 11, 2015

Install Floodlight on Ubuntu Server 14.04 LTS


  • sudo apt-get install build-essential default-jdk ant python-dev eclipse
  • tar xzf floodlight-source-0.90.tar.gz -C /opt --no-same-owner --no-same-permissions
  • cd /opt/floodlight-0.90/

  1. ant
    
    ...
    dist:
    [jar] Building jar: /opt/floodlight/target/floodlight.jar
    [jar] Building jar: /opt/floodlight/target/floodlight-test.jar
    BUILD SUCCESSFUL
    Total time: 25 seconds
  • java -jar target/floodlight.jar
    19:53:53.434 INFO [n.f.c.m.FloodlightModuleLoader:main] Loading default modules
    19:53:53.827 INFO [n.f.c.i.Controller:main] Controller role set to MASTER
    19:53:53.834 INFO [n.f.c.i.Controller:main] Flush switches on reconnect -- Disabled
    19:54:03.558 INFO [n.f.l.i.LinkDiscoveryManager:main] Setting autoportfast feature to OFF
    19:54:03.779 INFO [o.s.s.i.c.FallbackCCProvider:main] Cluster not yet configured; using fallback local configuration
    19:54:03.779 INFO [o.s.s.i.SyncManager:main] [32767] Updating sync configuration ClusterConfig [allNodes={32767=Node [hostname=localhost, port=6642, nodeId=32767, domainId=32767]}, authScheme=CHALLENGE_RESPONSE, keyStorePath=/etc/floodlight/auth_credentials.jceks, keyStorePassword is unset]
    19:54:03.853 INFO [o.s.s.i.r.RPCService:main] Listening for internal floodlight RPC on localhost/127.0.0.1:6642
    19:54:04.066 INFO [n.f.c.i.Controller:main] Listening for switch connections on 0.0.0.0/0.0.0.0:6633
    19:54:09.047 INFO [n.f.j.JythonServer:debugserver-main] Starting DebugServer on :6655

Proxy for apt-get in Ubuntu Server 14.04


  1. Download and Install NTLMAPS manually from https://packages.debian.org/sid/all/ntlmaps/download 
  2. Then, follows the steps

Configure it: domain, username, password, proxyserver.net, port
  1. Files: /etc/bash.bashrc
    export http_proxy=http://127.0.0.1:5865
    export https_proxy=http://127.0.0.1:5865
    export ftp_proxy=http://127.0.0.1:5865
    
    /etc/environment
    http_proxy=http://127.0.0.1:5865
    https_proxy=http://127.0.0.1:5865
    ftp_proxy=http://127.0.0.1:5865
    
    /etc/apt/apt.conf (create the file if it does not exist)
    Acquire::http::Proxy "http://127.0.0.1:5865";
    Acquire::https::Proxy "http://127.0.0.1:5865";
    Acquire::ftp::Proxy "http://127.0.0.1:5865";

Tuesday, February 10, 2015

Accessing file in VM (ubuntu) from ESXi Datastore


  1. Select the files to be moved from local device to ESXi server datastore.

  2. Make sure that the files are .iso format
  3. Upload to ESX. data-store

  4. Then, goto VM (Ubuntu)
  5. Select the CD/DVD and ESXi datastore, where .iso file is located

  6. In the datastore, select on .iso file
  7. Now, goto terminal in Ubuntu 
                                               sudo mkdir -p /mnt/cdrom
                                               mount /dev/cdrom /mnt/cdrom

Now files located in .iso file will be available to Ubuntu.

Saturday, January 10, 2015

Collecting SDN forwarder port status at SDN Controller

This is to gather the port status of every switch or forwarder at SDN controller.

Register the port_stats_in function:

def install(self):
# Handler
        ...
self.register_for_port_stats_in(self.handle_portstats_in)
        ...


def handle_portstats_in(self, dpid, stats):
    """
    Parameters in stats: port_no, rx_packets, tx_packets, rx_bytes, tx_bytes, rx_dropped, tx_dropped,       rx_errors, tx_errors, rx_frame_err, rx_over_err, rx_crc_err, collisions
    """
    print "Port Stats received...."
    print "Port stats in from datapath", longlong_to_octstr(dpid)[6:]
    for item in stats:
print '\t',item['port_no'],':',item['tx_packets'],':',item['rx_packets']
   
   ...

Friday, January 9, 2015

Activating vSphere


Courtesy: http://www.vmwarearena.com/2013/10/vsphere-55-download-free-esxi-55.html

Register or Login with your VMware account credentials
Once you have logged in ,  You will have been provided with the option to download the  ESXi 5.5 Installation ISO and VMware vSphere client along with the Free license key for ESXi 5.5 Hypervisor.
Once the installers are download. Complete the ESXi 5.5 installation or Upgrade and Connect to your ESXi host using vSphere Client.
Click on Configuration tab and select Licensed Features. Click on Edit
Enter the license key and Click on Ok.
You are done with the  ESXi 5.5 free license key assignment and it is never Expires now. I believe this is informative for you. Thanks for Reading !!!

Adding Hard Disk to ESXi 5.1 Server

The ESXi 5.1 doesn't support RAID configuration, there for better to use RAID 0 for minimum number of hard disk and add the remaining hard disk through vSphere Client.

The steps is as follows:

host > storage > add storage > Disk/LUN > next

....

Friday, December 5, 2014

Configuring PyDev to Eclipse for OpenFlow


  • Downloading the Eclipse CDT and Java
                       http://www.eclipse.org/downloads/?

  • Installing PyDev to Eclipse - It can be done in 2 ways:

          Update Manager
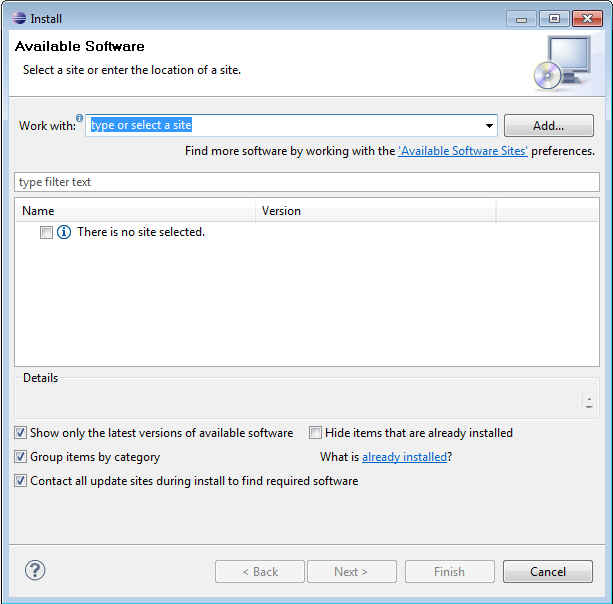
                  Go to the update manager (Help > Install New Software) and add: 
                  http://pydev.org/updates    or     http://pydev.org/nightly

                  and follow the Eclipse steps.

  1. Go to Help → Install New Software
  2.   
  3. Enter http://pydev.org/updates in the Work with:  field.
  4. After several seconds, two options should appear. Select the PyDev for Eclipse option. Do not select the "PyDev Mylyn Integration" flag.

  5.  
  6. Click "Next" and "OK" to continue installing PyDev.
  7. Select "I accept the terms of the license agreement", then click "Finish". The installer will begin to download the plug-in.
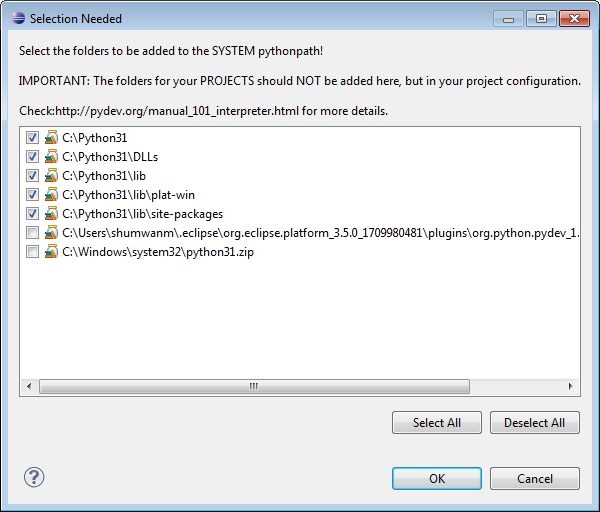
  8. Note: When you see the Selection Needed dialog box, you must manually check the box before pressing okay. If you do not, it appears that the installation is continuing, but it is not. You must uninstall PyDev, then reinstall.
  9. A security warning may appear asking whether you trust the software being installed- click "ok", then ensure the correct items are selected and click yes. The instillation process will continue.
  10. When the installation is complete, you will be asked if you want to restart Eclipse. Select "Yes". You may see a Subclipse Usage  dialog, just uncheck the box and continue.

        Zip File
                  The .zip file available here
                  An alternative is just getting the zip file and extracting it yourself in eclipse.
                  For Eclipse 3.4 onwards, you can extract it in the 'dropins' folder (and restart Eclipse).

  • Configuring PyDev


    1. Python must be installed to configure PyDev.
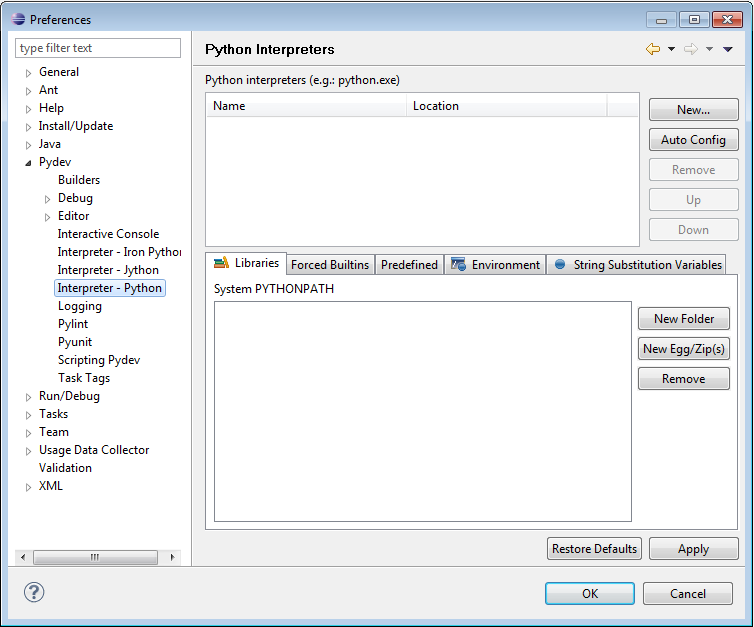
    2. Go to Window → Preferences. In the Preferences window, expand PyDev and select Interpreter-Python.
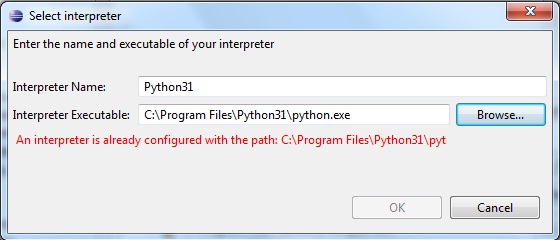
    3. Click "New..." and type Python32 for the Interpreter name. For the Interpreter executable, browse to your copy of Python (C:\Program Files\Python32\python.exe), and press Open.

      Click "OK" and the  Selection Needed Window will appear.
    4. Select all but the PySrc and python32.zip and click OK as many times as necessary to exit the preferences. The default selection should be fine.
    5. The Interpreter is now set up so that the code you write can be interpreted for the computer to run. You are now ready to start running code.


    Friday, November 21, 2014

    Syntax and parameters of different OpenFlow library functions

    The core function of OpenFlow is implemented in /opt/openflow-main/nox/src/nox/lib.

    The core.py contains following important functions:

    register_for_port_status(self, handler):
    register_for_datapath_leave(self, handler):
    register_for_flow_stats_in(self, handler):
    register_for_aggregate_stats_in(self, handler):
    register_for_port_stats_in(self, handler):
    register_for_table_stats_in(self, handler):
    register_for_datapath_join(self, handler):
    register_for_flow_mod(self, handler):
    register_for_flow_removed(self, handler):
    register_for_packet_in(self, handler):

    The file describes the syntax to be followed while declaring a handler function.

    Simple program for understanding OpenFlow

    I thank Mr. Michael Karl for helping me in understanding the OpenFlow modules.


    # Import helper classes
    execfile('/opt/openflow-main/nox/src/nox/coreapps/mycontroller/main/myrouting.py')

    # Initialize helper classes
    myrouting = My_Routing()
    Ramakrishna = RamakrishnaModule(); # init Ramakrishna's module

    def oflogger(txt):
    logger.warn('-OPENFLOW / WARN- : ' + txt + '\n')

    def oferror(txt):
    logger.warn('\n\n\n-OPENFLOW / ERROR- : ' + txt + ' \n\n\n')

    class mycontroller(Component):
    """ Main control component for NOX of My OpenFlow Network
    """

    def __init__(self, ctxt):
    """ Initialize the my controller
    @param ctxt: nox context. This is only needed for the super constructor
    """

    # Call inherited constructor
    Component.__init__(self, ctxt)

    Ramakrishna.setCtrl(self)

    # init internal variables
    self._discovery = self.resolve('nox.netapps.discovery.discovery.discovery')

    logger.debug('OPENFLOW-CONTROL Initialized')


    def install(self):
    """ Install self as NOX component. This method will be called by the NOX framework.
    All we do is register ourselves to the appropriate events.
    """

    # Handler
    self.register_for_packet_in(self.handle_my_packet_in)
    self.register_for_datapath_join(self.handle_my_dp_join)
    self.register_for_datapath_leave(self.handle_my_dp_leave)
    self.register_for_flow_removed(self.handle_my_flow_removed)
    self.register_for_flow_mod(self.handle_my_flow_mod)
    self.register_handler(Link_event.static_my_get_name(), self.handle_my_link_event)


    logger.debug('OF-CONTROL Installed')

    def getInterface(self):
    """ Returns a string representation of this my controller object """
    return str(mycontroller)


    def handle_my_packet_in(self, dpid, inport, reason, length, bufid, packet):
    """
    This function is called to notify the controller of an incoming packet on a router
    @param dpid: DPID of the switch receiving the packet
    @param inport: port at the switch on which the packet was received
    @param reason: ???
    @param length: Length of the incoming packet
    @param bufid: ???
    @param packet: the packet blob
    """

    # Could not parse packet. Ignore
    if not packet.parsed:
    return CONTINUE

    # Forward every packet seen by the controller also to Ramakrishna's module
    Ramakrishna.PacketIn(dpid, inport, reason, length, bufid, packet)

    return CONTINUE

    def handle_my_dp_join(self, dpid, stats):
    """
    This method is called when a switch joins us. We notify our helpers, reset the switch and set some parameters
    @param dpid: DPID of the switch that just joined
    @param stats: stats of this switch
    """

    Ramakrishna.DPJoin(dpid, stats)
    self.switch_reset(dpid) # Reset switch and set parameters

    return CONTINUE

    def handle_my_dp_leave(self, dpid):
    """
    This method is called when a switch leaves. We notify our helpers and delete the flows.
    @param dpid: DPID of the switch that just left
    """

    Ramakrishna.DPLeave(dpid, stats)
    return CONTINUE

    def handle_my_link_event(self, event):
    """
    This handles link add and remove events. Basically only notify our helpers (and delete flows).
    @param event: the link event. Contains action and link details
    """
    Ramakrishna.LinkEvent(event)
    return CONTINUE

    def handle_my_flow_removed(self, dpid, flow, priority, reason, cookie, dursec, durnsec, bytecount, packetcount):
    """
    This method handles removed flows by removing them in the helpers
    @param dpid: is the datapath id of the switch.
    @param flow: is a NOX flow dictionary
    @param priority: is the flow's priority
    @param reason: why the flow was removed (see ofp_flow_removed_reason)
    @param cookie: is the flow's cookie
    @param dursec: is how long the flow was alive in (s).
    @param durnsec: is how long the flow was alive beyond dur_sec in (ns).
    @param bytecount: is the number of bytes passed through this flow.
    @param packetcount: is the number of packets passed through this flow.
    """

    Ramakrishna.FlowRemoved(dpid, flow, priority, reason, cookie, dursec, durnsec, bytecount, packetcount)
    return CONTINUE

    def handle_my_flow_mod(self, dpid, flow, command, idle_to, hard_to, buffer_id, priority, cookie):  
    """
    Manages modified flows by telling the DataStore (except for delay measurement flows)
    @param dpid: is the datapath id of the switch.
    @param flow: is a NOX flow dictionary
    @param command: is the type of flow mod (see ofp_flow_mod_command)
    @param idle_to: is the idle timeout of the flow
    @param hard_to: is the hard timeout of the flow
    @param buffer_id: is a buffer id assigned by the switch, or -1 if there is no buffer. (This is not meaningful for OFPFC_DELETE command).
    @param priority: is the flow's priority
    @param cookie: is the flow's cookie
    """

    Ramakrishna.FlowModification(dpid, flow, command, idle_to, hard_to, buffer_id, priority, cookie)
    return CONTINUE

         
    def getFactory():
    """Builds a factory class for ofcontrol
    """
    class Factory:
    def instance(self, ctxt):
    """Returns a new mycontroller instance
    """
    return mycontroller(ctxt)
    return Factory()


    Execution Steps:


    cd /opt/openflow-main/nox/build/src/
    ./nox_core -i ptcp:6633 monitoring mycontroller

    Friday, November 7, 2014

    Installing ESXi 5.1

    The ESXi 5.1 is available in below given link:

    https://my.vmware.com/group/vmware/details?downloadGroup=VCL-VSP510-ESXI-51U2&productId=285#errorCheckDiv

    or

    https://my.vmware.com/group/vmware/evalcenter?p=free-esxi5&lp=default


    The system compatibility can be checked using :

    http://www.vmware.com/resources/compatibility/search.php?lp=default


    The ESXi server can be accessed through vSphere Client:

    http://www.empirion.co.uk/vmware/vmware-vsphere-client-direct-download-links/


    Installation procedure is available in:

    For ESXi Installation:

    http://www.thegeekstuff.com/2010/06/vmware-esxi-installation-guide/


    For vSphere Client:
    https://pubs.vmware.com/vsphere-51/index.jsp?topic=%2Fcom.vmware.vsphere.install.doc%2FGUID-1F4EB138-3301-4AC9-9B48-61166E0EBE24.html